Saturday, July 30, 2005
I Love Small Crazies
Jenn's comment in my last post just got me all giddy about my dog, so here is is. He is a Jack Russell Terrier/Whippet mix with some other thing thrown in which no one can figure out- cattle dog? Did you know that Whippets are actually a greyhound JR-Terrier combo? So maybe our dog is really just a Whippet/Cattle Dog mix. Who knows! We also don't know how old he is. He was a pound dog. But I do know that he ain't no Schipperke! (that's what they had him listed as at the pound.)
The pose you are seeing here is his usual "I'm a good dog and no threat to you" pose. He is a very sweet, nervous dog. He used to pee nearly every time that we touched him for a couple of years after bringing him home. He was also afraid of aluminum cans. He had bad owners before us. I think they were drinkers and that's why he didn't like cans. They had moved out in the middle of February leaving him behind tied up outside to a dog house! The neighbors finally called the Humane Sociaty after he had been out there for THREE DAYS! poor doggy! Once, after we brought him home, he got loose in winter and took off happily running down the street. He got one house over before he realized how cold it was and promptly ran inside the house when someone opened the door to get the mail. She said that he just stood there whimpering and alternately lifting his feet. How did he survive THREE DAYS?
Here is our proud dog protecting his turf. What was that? A mean, nasty motorcycle coming to threaten my authority? He barks at anything with wheels. He also goes nuts over dogs. He wasn't dog-socialized and sees any dog as big or bigger than him as a threat. He loves our cat though and treats him like the boss that he is. He will try to get close to the cat and the cat will punch him (and that cat can punch hard! I've been bruised by him before). The dog starts wagging his tail and runs to get his ball. Oh yea! The cat wants to play! he's thinking. He will actually bring the ball up and give it to the cat, to which the cat looks completely disgusted at the fact that the dog does not realized he's actually being dissed. What an Idiot! the cat announces with an indignant look and a toss of his tail as he walks out of the room.
He tries very hard to be like us and help out. He really likes to help me garden. When he sees me digging in the garden he starts digging too; otherwise he never digs in the yard. When I water, he follows me around. He's even gotten to know where I go to garden. He was folowing me while I was watering one day, I looked at him and said, "I'm going to the front yard now." I did not motion or look in that direction or anything. His face lights up and he takes off running for the front yard. He has a pointing pose he does when he has spotted something interesting and immediately went into it upon reaching the front yard. When I reached him I saw that he was pointing at the new garden that I had started in the boulevard. How did he know that was what I was going to work on? What a smart doggy.
We put Invisible Fencing two years ago and what a difference it has made in him! He doesn't submissively pee on a regular basis anymore. We can actually leave him outside longer because he barks less. And he is far more able to handle guests. Although he is still useful when we get solicitors. They get to be in quite a hurry when a dog pees on their leg!
Friday, July 29, 2005
Now You See Em, Now You Don't!
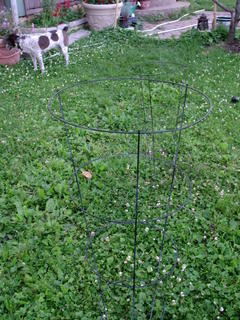
A while back I was talking about using tomato cages to contain plants. They are cheap and easy to store (although I leave mine out all year round- it helps me know where my plants are, plus I don't have to worry about getting them into the garden on time the following year). The problem as you can see is that they aren't very attractive and they are very noticeable. So what I do is paint them black.
Here you can see that they are far less noticeable and they actually don't even look that bad. Oh, and you can see my cute, crazy terrier in the background. AWE! Ain't he adorable?!
This is a really good cheap way to contain plants that do not get too heavy. I use these around all my delphiniums and around my hardy hibiscus. If your plants do get too heavy, you can always prop these up with some heavy duty garden stakes.
Thursday, July 28, 2005
Holy Hibiscus!
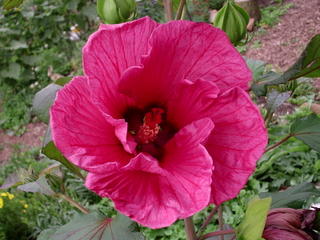
Here is the flower from the main plant of the Plum Crazy hardy hibiscus that I saved awhile back. The very first bloom (you can see it darkened and withered in the right lower corner of this picture) came out the first morning SSBs grandparents from Arkansas came to visit. I told them that it bloomed just for them.
The blooms last just a day, but they are well worth having these beautiful giants in the garden. This flower is almost as big as my head.
Here is a wider shot of the plant. I'm hoping that there are plenty of extra shoots. I want tons of these flowers next year!
I am thinking of trying to protect them over the winter with some mulch. They don't come up until really late in the season, so I think that would be a very good idea. I have them in a well drained area as well. I'm hoping that will help keep them from getting too wet in the spring.
Saturday, July 23, 2005
Main Garden
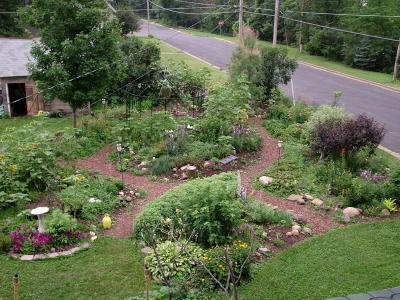
For those of you wondering what my garden looks like now, here it is in all it's jungly glory. It actually does look a lot better from a distance than up close.
I have even cleared all those weeds out of the paths now. That was hard work since the paths are sort of compact. After every rain I would go out and dig up a few weeds untill they were gone.
You can see the big hole in the back of my garden that I am trying to fill in to screen the view of my neighbors yard and the alley. I like to have that clear in the winter though because then we have a nice view of the downtown holiday lights. OooAhhh! So I have been growing sunflowers there as a summer screen. They did not get very tall this year. I think I transplanted then a little too late. So next year I am going to try transplanting them as soon as I find them growing around my garden. I now have a nice terraced planting area for them back there.
My sedums are sort of overwhelming the front bed nearest the patio. I have purchased allium to replace them. They will grow in neat bunching mounds and give somewhat the same effect only shorter. Now I just have to figure out what to do with all those sedum! They make a fine hedge. I must have an area that needs a hedge somewhere.
My black-eyed susan's in that same bed have finally decided to bloom. I bought a 4" pot of them about four years ago and they have been spreading nicely. They do not spread far from the main plant, so they aren't really invasive when they spread, unlike my gallairdia! Geez! That stuff is everywhere, even in my grass!
There is a tall, airy looking shrub near the alley that has pink plumes of flowers right now. That is my tamarix. I love it, but hate where I planted it. It hangs over onto the pathway and just sort of looks out of place there. Many people ask me about it though. It is very unusual looking and they like the pink smoke flowers.
I have relatives coming from out of town this Monday, and I want to make sure that my garden is up to speed. They really like gardens, so I hope that they like mine. It is a work in progress with its own messy but wonderful personality.
Wednesday, July 20, 2005
Sunflowers
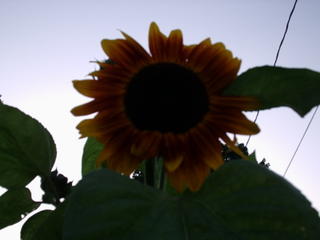
I planted sunflowers the first year that I started my garden at this house and I have never had to plant them since. The birds do a wonderful job of spreading the seeds all over my garden. In the spring I just move them where I really want them to grow. Most of my sunflowers are plain yellow variety (most likely from the black oil seed that I feed the birds. But there are also plenty from that original variety which was a multi-tone flower.
Sunflowers have always been one of my favorite flowers. I use sunflowers in my garden to create a screen to block out the view of the street and the alley, as well as giving our gazebo a bit of privacy. They also provide a little shade for some of my plants that do not prefer full, all-day sun. And they are fantastic natural bird feeders. I usually leave the plants in place all winter so that the chickadees and nuthatches can pick at them. I have never tried to collect the seeds for myself since the birds will eat them while they are still green and usually have the flower heads all picked apart by time the seeds ripen enough for me.
I don't see a lot of gardeners grow sunflowers. I'm not sure if it is because they don't like them or they think they are too tall for their gardens. Maybe they think that they have to have full sun. I have sunflowers of all heights and I even have a few growing in mostly shade! I didn't plant them in the shade, they just started growing there. I am going to try to collect the seeds from these to get a shade tolerant variety that maybe other people could grow in their garden.
Monday, July 18, 2005
Storm Damage I Wasn't Counting On
Well, today it finally cooled off thanks to a wicked storm we had last night. Since it was finally cool I was planning on packing up stuff we didn't need anymore for a yard sale that I am determined to have at the end of this week. As I was getting ready to go upstairs to start the torture, I decided that I had better go out into the garden to see if anything needed attending to due to the storm.
My mini greenhouse had been knocked over (for the um, fifteenth gazillion time- I really should do something about that). I was going to leave that until later since there weren't any plants in it and it wasn't getting any messier- or so I thought. Something kept telling me that I needed to go check it out anyway. So I went over to take a look. There was steam coming out of the greenhouse bottom, which I thought was unusual since the plastic should have kept most of the rain out and it really wasn't that hot out. That's when I smelled it. That wasn't steam. That was smoke!! MY GREENHOUSE WAS ON FIRE!!!!
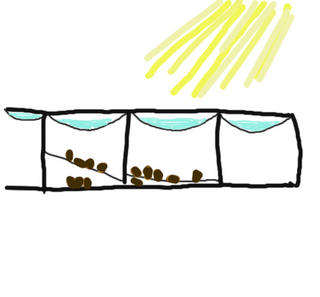
BOY! Was I glad that I follow my hunches! In hindsight though, I wished that I would have taken a picture of the beautiful set up that created the fire, but being the fast acting person in an emergency that I am, I flipped the greenhouse upright to stop the fire-making process. Now you will just have to make due with my primitive diagram of what actually transpired.
The greenhouse fell over and the rain collected on the plastic. The plastic protected the little peat starters that I had in the greenhouse from getting rained on. The rain water + the plastic acted as a lens to magnify the sun's light. The magnified light was so hot that when it hit the peat pellets, it got them burning. It was a thing of beauty, I tell you!
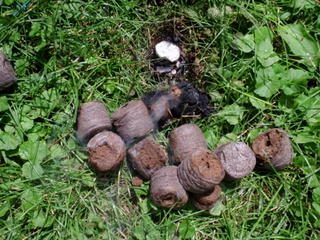
Here you can see the peat pellets smoldering away. One is even white from having been so hot. Can you see the smoke? (click on the pictures to make them bigger)
Here we see the huge hole the fire burned in my greenhouse door. If you look very carefully you can see the huge hole that was burned in one of the plastic trays I was using to hold the peat pellets.
Here's a better view of the destruction done to my greenhouse. Gruesome, eh? I'm glad that this greenhouse only cost $20! I can patch that hole, and now I know how to start a fire if ever I am stranded in the wild!
I Found IT!!!
Whew! I knew if I just kept trying different word combinations I would find the information on that hibscus. It is hibiscus trionum L., also known as Venice mallow or flower-of-an-hour (because the blooms last for such a short time- in fact I have seen them last only an hour some days, so this is a very fitting name). Here is a link to the identifying webpage I found. It was introduced from southern Europe and is now part of our country's wildlflower collection (or weed collection as you will soon read).
OldRoses was right (and I was so wrong!) in that some people consider this plant to be invasive and in fact is is listed by Washington and Colorado as a noxious weed (although they do not go on to say why they are considered noxious). The reason they are considered invasive is because they self-sow so readily and their seeds can lay dormant for up to 50 years! I have been growing them in my garden for eight years and they have never been a problem. If I want to get rid of them it is as simple as grabbing them and giving them a yank. They aren't like dandelions or violets where if you don't get the whole root, the plant comes back.
I can only guess that perhaps how invasive they are depends on where you grow them. There are lots of garden plants that I find far more invasive (spiderwort, you know I'm talking to you!). This plant was not listed on Wisconsin's list of noxious or invasive weeds so I will happily keep enjoying these beautiful little flowers!
Sunday, July 17, 2005
Wild Hibiscus
When these plants first started popping up in my garden 8 years ago I found the foliage interesting so I left them alone to see what they had to offer. Boy was I glad that I did! They were just beautiful. I didn't know what they were, so I looked them up to find out their habit and needs. At the time I found them in a very good source which identified them as wild hibiscus. Hibiscus and mallows are closely related. In fact, in many sources they are considered to be one family. They are still doing classification research to further sort out this group of plants, but until then, lets just enjoy our hibiscus-mallows!
These hibiscus are a true annual. They self-sow quite well, which is nice because the more plants you can have in a given area the better. The flowers bloom when it is sunny and only last one day, so if you only have a couple plants, you will not get a good showing. They get about 18"-2' tall and have an airy feel to them (not bushy). They are pretty sturdy and don't need staking. They will grow in some pretty awful soil, and have yet to seed out in some of the richer soils in my garden. The soils that they show up in most are just average soils with some clay. The seeds are easily collectible and they are easy to start. The plants transplant pretty well, so it is easy to just move plants that are too close together rather than wasting them by thinning. I usually space them about 6-12" apart. The foliage is better seen when they aren't crowded, but you get a better flower show when they are bunched closer together, because you can get more plants in an area. They like full sun to mostly sunny spots. They have no extra water requirements and take the heat really well. In fact right now many of my plants are suffering due to the heat wave that we have been experiencing and these little guys are simply thriving in it!
Friday, July 15, 2005
Now You Know Why I'm So Jealous
I was reading another garden blogger's comment on another garden blog about how everyone likes to show close-ups of the flowers in their garden, but rarely if ever do they show what the actual garden looks like. Although I have shown some full garden pictures before, I usually do shy away from it. Even though I have been working on my gardens for 8 years, I just don't think they are pulled together very well. Not like Sandy's or Zoey's. In fact, I didn't realize just how far I had yet to go until I saw their garden shots. Geez! I am SO SLOW! They've managed to do all that in just a few years. Eight!? What have I been doing?!
Well, despite my shame, here are some wider shots of my gardens. I have already gotten a bunch of ideas from all of you, so I'm hoping by this time next year I will have a lot of great shots that I can really be proud of!
This is one of my first garden beds. I guess it isn't looking too bad thanks to those asters that I snagged by the railroad tracks. And the shrubbery is maturing nicely too. Since this photo was taken I have moved the Silver Mound and planted a Big Daddy hosta there instead. It is getting a little too much sun right now and looks more green than blue, but once the birch grows up it should get plenty of shade.
This is the gardenside view of my delphinium patch. In the immediate foreground is a balloon flower. Then there are my lilies (well, a couple of my growing collection anyway). And of to the left you can see Early Sunrise coreopsis. I started those from seed 7 years ago and they have been migrating around my garden ever since. They are supposed to be perennials, but I have found that they don't like to stay in one area to long. Gypsy flowers I guess. Nice thing is, they move themselves!
Seed Importation
I looked it up and the law says that you can import seeds without a problem as long as they are clearly and honestly labelled, they are not or do not contain noxious seeds, they are under a certain amount, and they are clean seeds- no treatments. Go here to read the law itself. I think I might order some of those delphiniums now!
Thursday, July 14, 2005
New Lily
I have no idea what the name of these lilies is. I planted them three years ago and this is the first year that they have bloomed. The buds are almost deep maroon. When they first open up they are a black raspberry color, but as they age they begin to fade to a lighter shade from the tips of the petals slowly to the center. This lighter shade makes the flower seem as if it is glowing. I hope that I can find out the name of this one, but I think it was another of those "Lily" lilies I got from My-Mart-Of-Choice (to be refered to from now on as My-Mart). My best guess after hunting through all of my lily indexes is this one called "America".
Wednesday, July 13, 2005
Bunching Onions
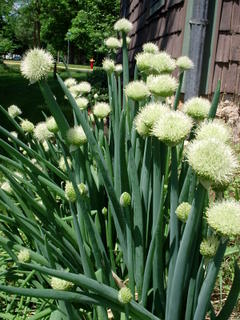
I started these bunching onions because I actually intended to use them in my cooking. However, as usual, I never got around to it and they started to flower. Oh, what wonderful flowers they are! I left them in the ground to see if they would come back, and they have for the last 6 years.
I like them in a huge bunch like this. I also let them seed out in some of my other gardens. They are even growing in a garden that is mostly shade! So they are versatile as well. Plus all the little extra plants that I thin out can be eaten. Yummy!
These actually bloomed about a month ago. Oops. I can't always be on top of things. That's why I love plants that need no special care- I'll forget to do it. These onions need nothing, except maybe a little staking when they get really tall and the flowers are heavy. These ones did just fine this year until a big storm bent some of them over. And really, I never stake them. I just let them bend where ever they want.
Tuesday, July 12, 2005
Delphinums-The Queen of Flowers
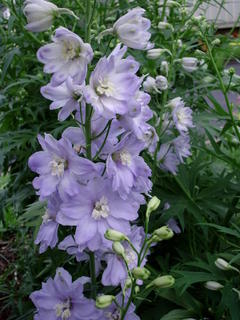
I love delphinums and I have very little trouble growing them. Here are a few that I could get good pictures of. The hummingbirds love them, which is good because I love hummingbirds!
I just planted some more delphiniums this year to make a nice huge patch of them. My delphiniums have been good about seeding too. Every year I find about 2-3 new plants. Maybe soon I will have enough for cutting.
The Belladonna delphiniums (picture 1) I have had for about 5-6 years. These are the easiest to grow and they are the tallest that I have grown so far, much taller than the Pacific Giants (pictured 2) I planted around them. Some of the other delphiniums don't last as long. They just decide they've had enough and shrivel up and die. I have concluded that they are most likely not staying moist enough, so I am trying extra humus and mulch around these ify ones. My Summer Skies kicked the bucket just days ago. But I loved it so much, I will definitely try again. Just like my favorite- Guinevere. I had this one for three years and it died last year. I planted two more this year in another part of the garden and at least one is really digging the new spot- there are tons of shoots coming up!
Here is a fantastic photo gallery of delphiniums. You can also order seeds from this company, but they are out of New Zealand and I'm not sure what the import laws are about seeds from other countries. If any of you know how to find out, please let me know. Of course I will probably have had it Googled before any of you even reads this.
Monday, July 11, 2005
Rock Garden
My husband likes rock. No, actually he LOVES rocks. He will run out to "pick up his check" and come home with a trunk full of rocks he picked out of corn and soybean fields. Yesterday, we hit the motherload. We were coming back from the bigboxhomeimprovementstoreofourchoice and he said, "I think there was a pile of free rocks back there."
Me: Do you want me to turn around?
SSB: Nnnooo.
Me: Are you sure
SSB: No
So I whipped the car around and headed back. ( I once was an amateur stunt driver) And sure enough there was a huge pile of beautiful rocks with a sign. Well, the message of the sign had been torn away, but we imagined that it said Please Take These Dang-Blasted Rocks Out of My Field! So we loaded up, and most likely SSB will be getting the rest later.
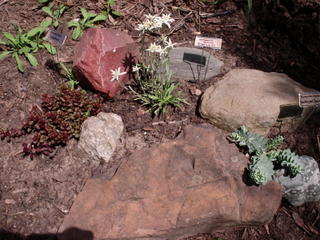
I have begun using some of the rocks that SSB has collected over the years to create a rock garden with the plants that I got a few weeks back. "Vodoo" sedum, Eidelweiss, and donkey spurge. My husband upon seeing the donkey spurge for the first time annouced that he didn't care for it. It has since grown on him as last night he told me that he really likes it and is very glad that I got it. I guess I know him better than he knows himself.
I have been meaning to put in a rock garden ever since I started this garden, so it is way past due. I know this isn't much right now, but I think that for only three plants, it is pulling together quite nicely. I can't wait to add some of the rocks we got last night!
Saturday, July 09, 2005
Perennials by Seed
I was looking for seeds for balsamroot when I found this nursery out of the Twin Cities, just 40 minutes from where I live, that has an amazing variety of perennial seeds. In my last post I was explaining why I was planning on growing by seed more often, but I was more or less talking about annuals. There are a few perennials that I have started by seed, but for the most part I buy them as plants. This would save me so much money, how can I resist? Plus, their variety is just mind boggling! The only downfall to their site is that they don't have pictures of the plants. I'm planning on just looking up the images on Google as I peruse the selections. Oh boy! I'm making up a wishlist tonight!
Friday, July 08, 2005
Seed vs. Store Started
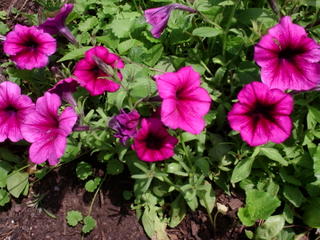
I have decided that from now on I will be planting more seeds rather than spending so much on started plants. These two pictures are of the same kind of petunia "Plum Pudding". The picture with just two plants is showing ones that I started from seed about a month ago. The other one is showing a bunch of about four plants that I bought from the store and planted about two months ago. Which do you think looks better? I personally find that the overall plant of those that I sowed directly in the garden look far better. Plus they were way cheaper. One packet of about 50 seeds cost the same as the pack of four plants. Now that's a bargain.
Thursday, July 07, 2005
Dilemma
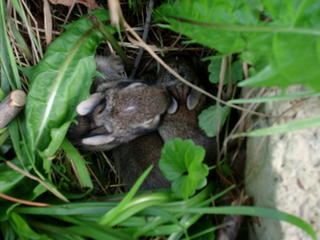
Right before we left for the Northwoods last Friday Our dog found these little guys in our yard. He's a Jack Russell mix so he's into finding rodents. He doesn't do them any harm (or at least hasn't yet), he just likes to play with them. We counted three Friday night, then four Saturday morning.
Monday, he dug them out again and I counted 6! Six little bunnies. Now I don't like rabbits, and I was seriously considering letting my dog chase them away (they are now big enough to run), but they are just so cute. I couldn't stand it if they got hurt. Plus, how could I live with my dog if he did them harm?
A rabbit has had her babies in our yard 4 of the 8 years that we have lived in this house. I really don't like that I am contributing to those nasty little rodents that eat up my plants and other gardeners plants every year. But they are so cute! And it's not like I'm trying to attract them! I do have a dog running the yard after all. I bet those damn bunnies know that he won't hurt them, but he keeps other animals away that would. Those wascally wabbits!
Tuesday, July 05, 2005
Cl. Charisma
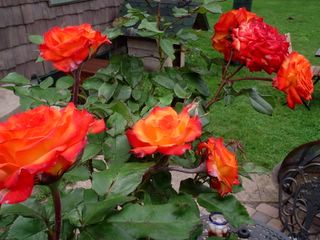
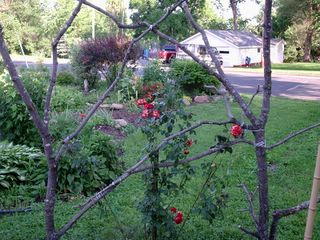
This is the climbing rose that the trellis was made for. It reminds me of fire. I like fire. Did I mention that I'm a bit of a pyro? I have two grills, 4 tiki torches, 6 glass lanterns, 2 wrought iron lanterns, and a fire bowl to quench my fire making desires. In fact, you can see the fire pit behind this rose.
This rose is a Everlasting Floribunda "Cl. Charisma". I don't know much about it. We bought it from a local department store. When we picked it out, I mostly got it for its color since there was no scent to the flowers. The leaves were a dark green with a little purple edging. The flowers, well, you can see for yourself. They just sell the plant! Who cares if it smells like anything!
We had it for about three weeks when my husband said that he could smell the roses as he was walking up to the house. At first I thought that he was talking about the white one that we had bought with Charisma since that one did have a scent (and a strong one at that). Then I remembered that the white one hadn't had a bloom on it for about a week- so it couldn't be that one. I went out onto the patio, and sure enough, Charisma does have a scent; and a very nice one at that! I guess it was just shy around all those other roses at the store. Or maybe it just really likes me!
Monday, July 04, 2005
Treellis
I like making things for my garden and I like things that look natural. That's one of the reasons that I like the rope corrals. I often use old branches for supports around the garden, too. I especially like the branches that have a lot of lichen on them. It just gives the garden a lot of extra interest.
We had a storm a few weeks back that knocked a very large branch off our tree. We were actually quite lucky; many of our neighbors lost trees and this branch just missed landing on our neighbors house (not that it was that big, but it could have done some damage). Instead of chopping it up for fire wood or taking it to the compost site, I saw a new project. We had bought a climbing rose at the beginning of spring and it was itching to climb something. So we cut the branch into two pieces of equal size. I siliconed the bottom 2 feet of each of the branches for waterproofing (we'll see if that works I guess) and we sunk them into the ground next to our patio. We sunk them between 18" and 2' deep with base gravel (decomposed limestone- for drainage to keep water from sitting against the wood and rotting it) and dirt (because we ran out of decomposed limestone). Then using some heavy gauge galvanized wire, we wired the smaller branches of the two large pieces together to make one strong piece. We planted the rose in the middle and voilĂ ! Now we have a very natural looking trellis.
You can see the nice lichen on the branches, and once the rose fills out, I think that this will look very nice. It has already been through three other very windy storms and didn't even budge, so I think we are in business. Now if only my rose survives the winter...
Friday, July 01, 2005
Behind the Rope, Please
A couple of posts ago I said that I would give instructions on how to make the containments that I use for my lilies. Here is a picture of them in use:This one is a new one, but by the end of the season it will be weathered to a nice gray-brown so it won't stand out as much. I like these because they kind of look like those ropes that hold people back at important events, or even like piers when they are weathered. They also let me know the area that the plant will come up in the spring.
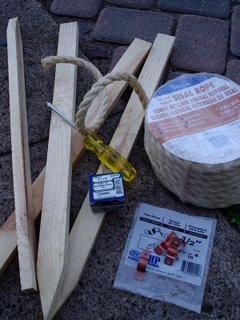
These are the materials that you will need for this. The stakes came in a package of about 30. These need to be thick, heavy stakes. Mine are pine, which will weather nicely, but will also rot quickly. You can also get cedar stakes (but they might be harder to screw into). The rope that I used is a sisal 1/2". The way that I attach the rope to the stakes is with copper pipe straps and zinc 8x1/2 screws.
Cut the amount of rope that you will need to get around the plant that you are making it for. I always make it a little bigger so that the plant has room to fill in. I attach the rope about 1/2-1" from the top of the stake. The two ends of the rope are overlapped and attached under one of the copper straps on one of the four stakes. Once the rope is attached to all the stakes, the stakes can be hammered into place around the plant with a rubber mallet.
Subscribe to:
Posts (Atom)